Showing posts with label simple recipes. Show all posts

Thursday, January 25, 2018

Tips for Packing a Healthy Lunch

Welcome back to PorrazzaNutrition! 

When I first went went full-time with my practice and quit my "day" job, I got out of the habit of packing a lunch. I was mostly out seeing clients in the AM and after dinner, so I only really needed to pack snacks on-the-go. This January, I took a short-term teaching contract at a local community college and with teaching 4 classes back-to-back and my office hours, snacks just weren't going to cut it! 

I wanted to share with you my essentials for packing a healthy lunch, basics to keeping the nutrient balance, and how to prep smart! 

My fancy new collapsible container!
Essentials
Lunchbox - I prefer the insulated varieties and definitely go with boxes/bags that have a handle since I carry a lot of work bags. 

Ice Packs - I like the gel ones versus the harder packs. The gel makes it easier to mold around my containers. 

Reusable Containers or Mason Jars - I love using the short mason jars for my soups, stews, and fresh fruit since they don't spill! I did buy a collapsible container for my leftovers; however, I didn't think about how large it was when I bought it. It is awesome, but doesn't fit in my current lunchbox. So, make sure you have your lunchbox specs before buying a fancy new container!

Baby carrots for the win!

Nutrient Balance
When I pack my lunch, I always think of PCV - protein (lean), carbohydrate (high-fiber), and veggie (usually non-starchy) for the main fare. I also pack some extra veggies, fruits, and bars for my snacks/sides. I never know what food mood I will be in (i.e. crunchy, sweet, savory, soft), so I like to have a variety to choose from. Side note here, having a backup plan is key! You never know if you will hit traffic in a work commute, if you need to hang around for questions from staff, or if lunch ends up getting pushed back. Be prepared for when life gets crazy so you stay on track and fuel your body with good-for-you foods. 

Prep Smart
Peanut butter balls for snacks!
I won't lie, I rely a lot on portioned unsweetened applesauce cups, no-sugar-added dried fruit (mango and prunes are my favorites), and baby carrots for my lunch/snack staples. I have been trying to spend more time on prepping the larger parts of my meals versus the snack/side items to save time. 

I usually carve out about 30-minutes of time on Sunday nights to prep for the week. This means peeling oranges and portioning them into containers, putting baby carrots in containers, scooping out hummus, and pulling applesauce cups from the bottom of the fridge to the top. Whatever will make my night before prep easier the better!  
I also make a lot of my lunches from my leftover dinners. I highly recommend batch-cooking grains (i.e. brown rice and quinoa) and even your proteins (like tofu) to make into easy meals. I have been trying to make more of my own snack bars/power balls versus buying them since it has gotten pretty costly. I like making these peanut butter balls 1 day and eating them all week for snacks!

I hope this gives you some tips to packing a healthy lunch! Have a great rest of your week!

Bean salad with carrots and hemp seeds + orange + dried mango + sweet potato chips!


Wednesday, January 10, 2018

Better-For-You Lasagna Recipe (Gluten-Free, Vegan)

The time has come! I finally (I hope) perfected my lasagna recipe! I don't even know the last time I had lasagna since gluten-free lasagna noodles are so hard to find! This is a simple and easy-to-freeze recipe that the whole family will enjoy!

Better-For-You Lasagna Recipe (Gluten-free, Vegan)
Ingredients
2 boxes Explore Cuisine Green Lentil Lasagna*
1/3 cup 100% lemon juice
12-ounce soft tofu, drained **
1/4 cup nutritional yeast + extra for layers
2 tablespoon Italian seasoning
2 teaspoons onion powder
2 tablespoons olive oil
Dash of salt and pepper
Low-sodium vegetable broth***
Two 24-ounce jars of Victoria pasta sauce (or marinara)****
Optional Ingredients: 1-2 handfuls of spinach, 1/4 cup Vegan Parmesan, 1 bag Vegan "meat" crumbles

Directions
1. Preheat oven to 350 degrees F. Grease a 13x9" baking dish.
2. In a high-powered blender or food processor, puree: lemon, tofu, nutritional yeast, Italian seasoning, olive oil, optional spinach, onion, salt and pepper.
3. Layer in baking dish in this order: about 1/4 cup marinara/sauce, 3-4 noodles, 1/4 cup of marinara, 1/4 cup tofu ricotta, optional crumbles, 1 tablespoon nutritional yeast, 1 tablespoon optional vegan Parmesan, 2 tablespoons sauce and 3-4 noodles. Repeat ending with noodles topped with sauce and Vegan Parmesan.
4. Bake, covered, for 45-55 minutes. 

Recipe Notes
*You can use any pasta; however, this brand is gluten-free and vegan. It also has a nice amount of protein and fiber, which makes it more of a complete meal. These lasagna noodles are also ones that do not need to be pre-cooked, which saves time.
**Regular firm tofu can also be used. This creates the "ricotta."
***If the tofu ricotta is too thick and will not blend properly, add in a few tablespoons of vegetable broth or almond milk to thin out. Do this by 1 tablespoon at a time, as you don't want the recipe to become runny.
****I prefer this brand since there are simple ingredients. You can also use homemade pasta sauce too or any other brand. Typically, I use the full 2 jars. If you like more sauce on your lasagna, plan to reheat  it or will be hot holding on a serving line, I would grab 3 and add in a little extra sauce within the layers so it does not dry out.
--> Optional Ingredients: You can barely see or taste the spinach, so I always add it to boost the nutritional content. I would highly suggest putting the spinach in the food processor versus throwing in the loose leaves.
-->For the layers, I just estimated the amount of sauce and ricotta. Typically, I just scoop and spread in an even layer until the noodles are covered. You can totally pack the layers more and do less "noodles,"  or add more sauce. It really is up to your preference.

Monday, September 25, 2017

Stuffed Mushroom Caps (Plant-Based, Gluten-Free)

I have been in a huge food rut lately! Anyone else ever get to that point? I feel like all I do is cook the same meals over and over. To spruce things up in the kitchen, I made it a point to buy and cook foods that I haven't made in a while (or never tried before). My goal was to try something different at least once per week.

With that, I have fallen back in love with mushrooms, which are currently in season. Mushrooms are low in calories, yet, high in Riboflavin (Vitamin B2), which plays a key role in energy production and metabolism. Mushrooms are also good sources of Niacin and Copper. Check out the recipe below for my stuffed mushroom creation, which can be altered to your food preferences! This is a great way to use up leftovers too.

Stuffed Mushroom Caps Recipe
Plant-Based, Vegetarian, Gluten-Free

Ingredients
6 baby bella mushroom caps, cleaned with stems removed
3/4 cup mild low-sodium salsa
1 flax-egg
1/2 cup cooked brown rice
1/4 cup cubed extra-firm tofu
2 tablespoons almond flour
3 tablespoons nutritional yeast
1/4 teaspoon each: garlic powder and onion powder
1 teaspoon Italian seasoning
Dash salt and pepper
Optional toppings: fresh, diced tomatoes + shredded dairy-free cheese + nutritional yeast

Directions
1. Preheat oven to 350 degrees F. Line a baking sheet with parchment or greased foil.
2. In a single layer, place mushrooms with cap side down.
3. In a medium bowl, mix together all ingredients and gently stuff into each mushroom cap.
4. Bake, uncovered, for 30-40 minutes or until caps are soft and stuffing is hot.
5. Top caps with optional ingredients and broil for 2-3 minutes or until golden brown. Enjoy!


Recipe Notes
-Portabello mushrooms can also be used. The mix makes enough for 5-6 portabello mushrooms.
-In place of salsa, you can use diced tomatoes.
-In place of the brown rice, you can also use quinoa.
-1 flax-egg can be made by mixing 1 tablespoon ground flaxseed and 3 tablespoons of water. Let sit for about 3 minutes (will gel together).
-Tempeh or a crumbled veggie burger can be used in place of the tofu.
-Flaxseed meal, coconut flour, whole wheat flour, can also be used.
-Seasonings can be adjusted based on taste preference.
-Extra "stuffing" can be heated on the stove-top and served with whole grain or corn chips!
-To reduce cooking time, ingredients can be sauteed in a pan prior to stuffing in each mushroom.


Thursday, July 6, 2017

Lemon-Berry Muffins

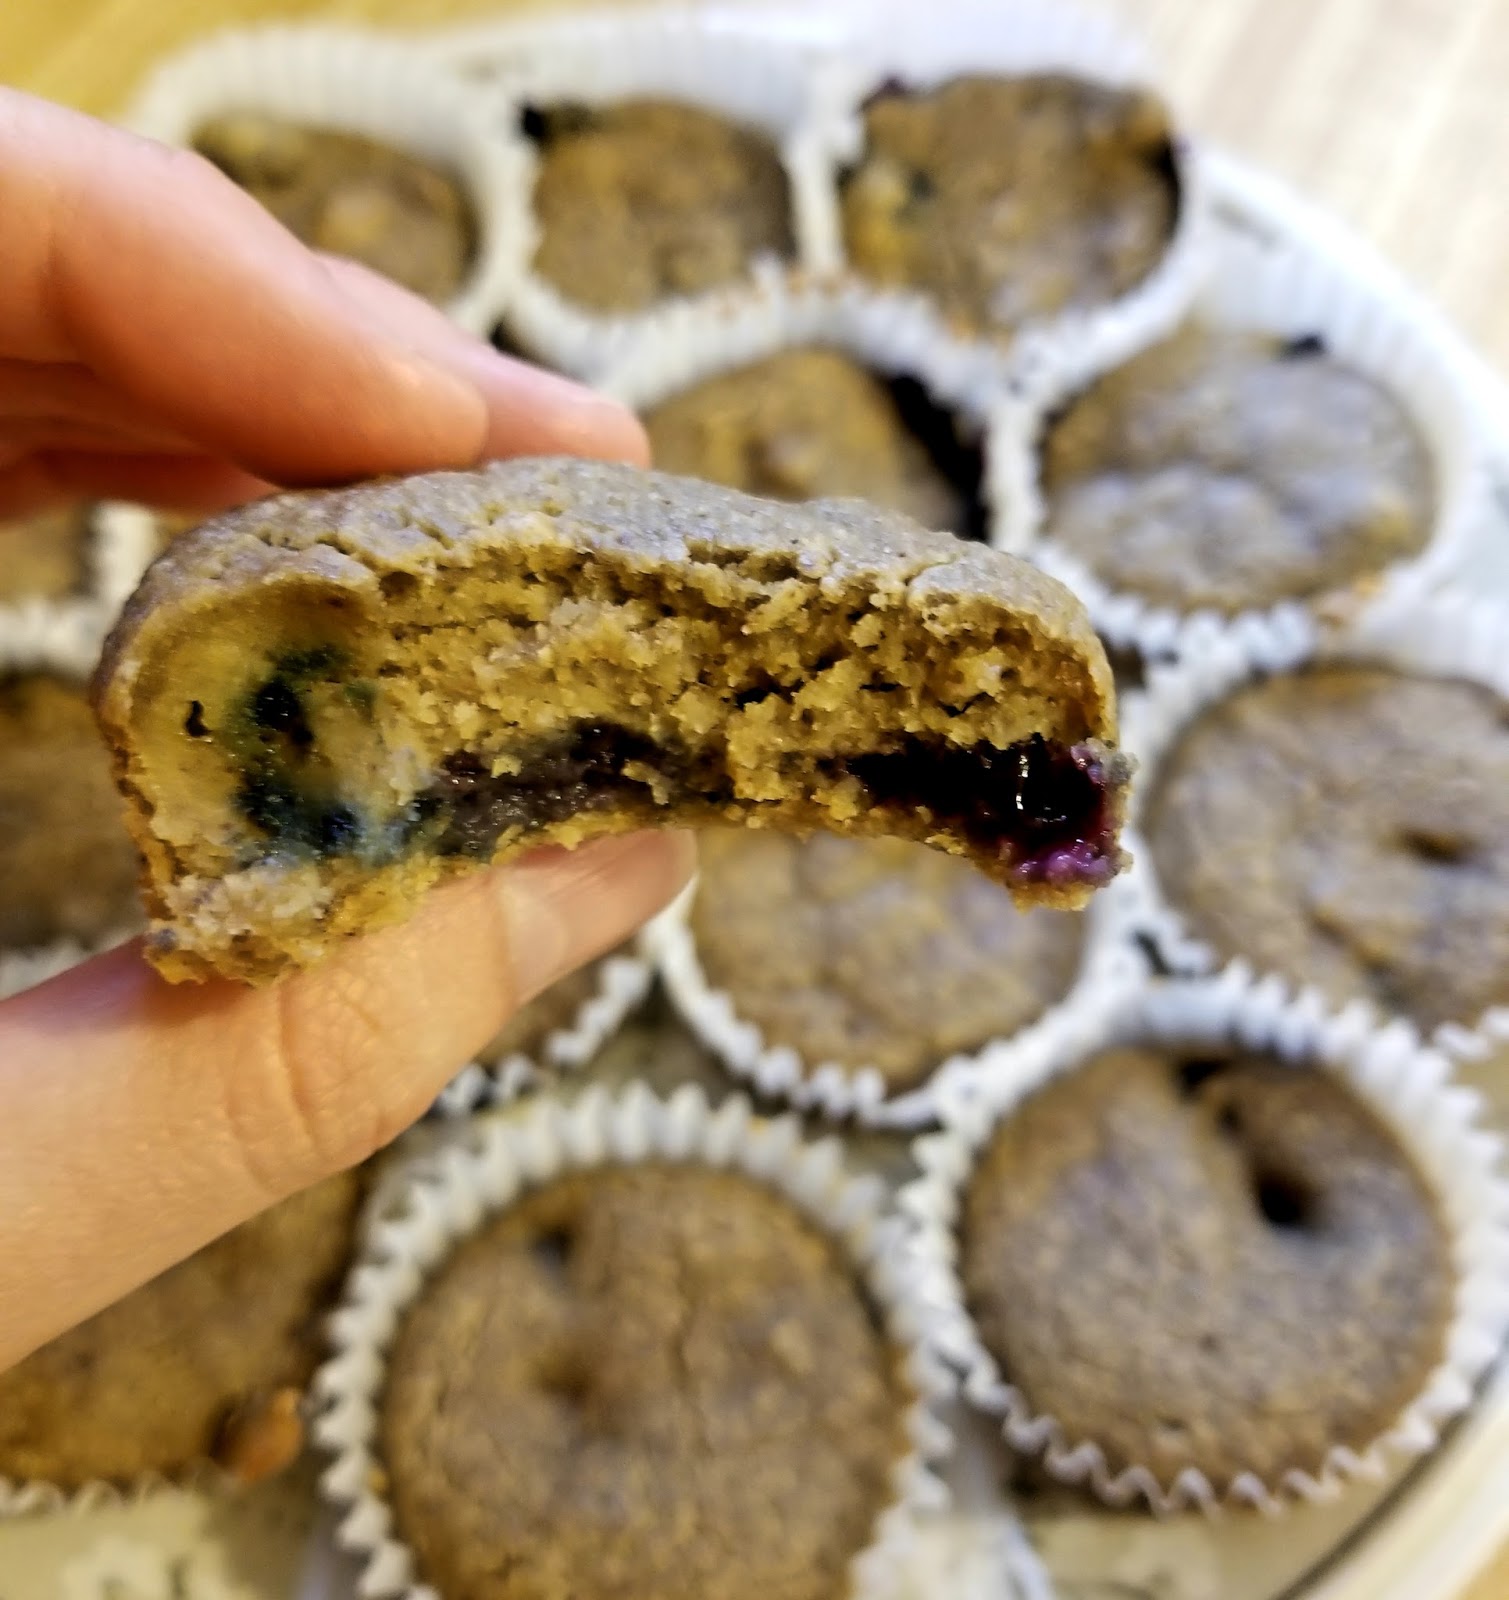
Recently, I have been looking for a better-for-you muffin recipe that I could make and have as a snack when I wanted something sweet. A lot of the gluten-free, vegan baked goods are loaded with sugar and have really little fiber. I ended up combining a few of the recipes in my cookbooks with others I found online for these sweet little treats! I love making them in mini-muffin pans; however, for the recipe below, I used a standard 12-count muffin tray. Enjoy!

Lemon-Berry Muffins 
*Vegan + Gluten-Free 

Ingredients
1 large banana
1/2 cup almond milk
2 tablespoons almond butter
1.5 teaspoons lemon juice
1 teaspoon vanilla extract
1 1/4 cup gluten-free rolled oats (uncooked)
1/2 cup almond flour
1/4 cup 100% pure maple syrup
1/2 teaspoon baking soda
Pinch salt
1/2 cup blueberries

Directions
1. Preheat oven to 350 degrees F. Grease a 12-count muffin tray or line with muffin cups.
2. Add all ingredients, except blueberries to a blender and blend until smooth. Mixture will be thick; however, if there are issues blending, add in almond milk, 1 tablespoon at a time.
3. Fold in blueberries. Spoon mixture into prepared tray and bake for 15-20 minutes.

Recipe Notes
-Makes 12 standard-sized muffins, serving 6.
-Can make in a mini-muffin tray; however, decrease cooking time to about half.
-Can substitute cashew milk or pea milk for almond. Pea milk will add in protein.
-Can substitute sunflower seed butter or peanut butter for the almond.
-If you are not gluten-free, can use regular rolled oats
-Store at room temperature for 2-3 days in an air-tight container or in the fridge up to 1 week.

Thursday, June 22, 2017

Pizza Quinoa Bites

Welcome back to PorrazzaNutrition! Today, I want to share with you a recipe I just revamped from my old cooking files. I have been trying to weed through my collection of recipes to figure out the ones I actually use and those I was just hoarding :) I am challenging myself to 1 day per week where I try new recipes and incorporate the tasty ones into my weekly meals or party rotation (since I usually bring healthy dishes wherever I go). My challenge to you this month is to get in the kitchen and try a new recipe or revamp (in a healthy way) an old one from your collection!

Pizza Quinoa Bites

Ingredients
1 cup uncooked quinoa
1/2 cup low salt tomato sauce **
1.5 cups water
1 small onion, diced
1 teaspoon olive oil
2 teaspoons minced garlic
2 flax eggs **
1/2 cup fresh basil, chopped
1/2 cup grape tomatoes, diced
1 teaspoon Italian seasoning
1/2 cup nutritional yeast **
Dash of salt and pepper

Directions
1. In a large pot, bring to a boil quinoa, tomato sauce, and water. Lower and simmer, covered, for 20 minutes.
2. Preheat oven to 350 degrees F and line a baking sheet with parchment paper.
3. In a small saucepan, saute onion and garlic in olive oil for 3-5 minutes over medium-low heat.
4. In a large bowl, mix together onion/garlic, quinoa, flax eggs, basil, tomatoes, Italian seasoning, nutritional yeast, salt and pepper. Adjust seasonings to your taste.
5. Form mixture into bite-sized patties and place on prepared baking sheet. Bake for 15-20 minutes. Flip and bake for an additional 5 minutes (or broil for 1-2 minutes for crispier patties). Serve with fresh tomato sauce.

**Recipe Notes
-No-salt-added crushed tomatoes can be used in place of tomato sauce.
-To make a single flax egg, which is a replacement for 1 whole egg, simply mix 1 tablespoon of ground flaxseeds with 3 tablespoons of water. Double to make the two needed for this recipe.
-Nutritional yeast is a substitute for dairy-cheeses and can be found online or at most health-food stores.

Thursday, June 8, 2017

Simple Homemade Applesauce

This past week, I shared my super simple, no-added-sugar, recipe for homemade applesauce with my cooking class. This is one of my favorite recipes to make especially when I have some older and softer apples. I love the way my house smells while this is cooking too :)

When choosing apples, look for ones with a shiny, firm, and smooth skin. Apples are a good source of vitamin C, which boosts your immune health, and a great source of fiber, which is good for digestive health and may help to lower cholesterol levels. Apples are also high in antioxidants, which may help to reduce your risk of cancer, hypertension, diabetes, and heart disease. It is best to leave the skin on your apples to retain all of the fiber and nutrients. With the recipe below, since you will be blending the final product, you won't even notice the skins!

Homemade Applesauce (Stove-top)*
Yield: approx. 4 cups

Ingredients
4 apples, roughly chopped, with skins
1/2 cup water
1 teaspoon cinnamon
Pinch ground nutmeg

Directions
1. In a large saucepan, mix together all ingredients. Cover and cook on medium heat for about 15-20 minutes or until softened.
2. Using an immersion blender, blend apples to reach desired consistency.**
3. Store in an air-tight container in the fridge (I used mason jars).

Notes
*Recipe can be made in a slow-cooker. Cook on low for 3-4 hours (will vary based on size of slow-cooker and amount of apples).
**You can also use a fork or standing blender to mash/puree the apples to your desired consistency. 

Nutrition Per 1 Cup: 70 Calories, 150mg Potassium, 19g Carbohydrates, 3g Fiber, 14g Sugar, 13% DV for Vitamin C

Thursday, March 9, 2017

Sauteed Zoodles with Fresh Pesto

March is here so that means it is National Nutrition Month! This is one of my favorite times as a Dietitian! For 2017, the theme is "Put your best fork forward," which I love because it makes me think of not only choosing healthy foods, but also, cooking more! I often get client feedback that revolves around not having enough time to cook. My challenge for those of you reading this post is to commit to cooking at least one day/night per week. Once you get that down, increase to two or or even three nights! If the weekdays are too busy for you to cook more involved meals/recipes, try batch cooking on the weekends and freezing for later use. Stock-up on items like canned beans or frozen steamable veggies for when your not in the mood for cooking. To take it a step further, try incorporating new and healthy recipes in your weekly meal rotation.

Try out the zoodles (zucchini noodles) recipe below as a side dish or make it a meal by adding a lean protein and high-fiber carbohydrate (like chickpeas)!

Sauteed Zoodles with Fresh Pesto 
Yield: 4 servings 

Ingredients 
4 medium zucchini, ends trimmed
2 cups fresh basil
1/2 teaspoon minced garlic
1/3 cup olive oil
2 teaspoons lemon juice (can increase to 1 tablespoon if you prefer a more lemony flavor)
1/2 cup cherry tomatoes
Salt & pepper
**Flavor add-ins for pesto: pine nuts, minced onion, walnuts, or nutritional yeast

Directions 
1. Using a vegetable peeler or spiralizer, slice zucchini into noodles. Set aside in bowl.
2. Food process: basil, garlic, olive oil, and lemon juice.
3. In a large skillet, combine zucchini noodles with pesto and saute over medium heat for 5-7 minutes.
4. Top noodles with tomatoes and season to taste with salt and pepper.

Nutrition: 190 Calories, 17g Fat (12g Monounsaturated Fat & 3g Polyunsaturated Fat), 65mg Sodium, 522mg Potassium, 9g Carbohydrates, 3g Fiber, 3g Sugar, 1g Protein, 44% Vit A, 29% Vit C 

Tuesday, May 27, 2014

Faux Cookies Recipe

In another blog post a few weeks ago, I had a recipe titled, "Faux Cookie Dough." The support group class I lead had challenged me to try baking the cookie dough. I invested in this challenge today and had an awesome result. By this awesome result I mean I baked 65 cookies and ate 5 so far today :)

I didn't use my original recipe, but a modified one from My Whole Food Life, which has a ton of awesome recipes. I have the recipe below with the nutrition facts. You would probably get the same, or a similar result if you baked the "Faux Cookie Dough."

Faux Cookies
Ingredients
2.5 cups chickpeas, rinsed and drained
4tsp vanilla
1.5 cups peanut butter
2T honey
2tsp baking powder
1/2c chocolate chips

Directions
1. Preheat oven to 350 degrees F.
2. Food process all ingredients except chocolate chips.
3. Fold in chocolate chips.
4. Roll into balls and place on a greased baking sheet.
5. Bake 10 minutes.

Nutrition Facts per 1 cookie (yield=5.5 dozen)
Calories: 50
Fat: 3g
Sodium: 65mg
Carbohydrate: 5g
Sugar: 2g
Protein: 1.5g

Just for comparison purposes, I have the nutrition facts for a regular chocolate chip cookie.

Nutrition Facts per 1 cookie
Calories: 50
Fat: 3g
Sodium: 36mg
Carbohydrate: 8g
Sugar: 4g
Protein: 1g

Friday, April 11, 2014

Faux Cookie Dough Recipe

On Thursday nights, I facilitate a weight management support group. I usually bring in a new recipe or food item; however, this week a member volunteered to make something. She said she would be bringing in a fake cookie dough dip she found in a magazine. I was a little skeptical on what it would taste like, after hearing the ingredients; but hey, I am always up to trying new things. This is definitely a MUST TRY recipe! Again, one of those recipes where you don't tell people what is in it until afterwards! It goes great with apple or banana slices.

Faux Cookie Dough Dip
Ingredients
1 1/2c chickpeas
6T brown sugar
1/4c peanut butter
3T oats
1T milk (almond milk can be used)
2tsp vanilla
Dash salt
1/8tsp baking soda
1/3c chocolate chips

Directions
1. Food process all ingredients except chocolate chips. (I find it best to food process the beans with some type of liquid--like milk--first to make it smoother).
2. Fold in chocolate chips.
3. Serve with apple/banana slices and enjoy!

Nutrition Facts (per 2T with recipe yield of 2cups)
Calories: 90
Fat: 3g
Cholesterol: 0mg
Sodium: 100mg
Potassium: 50mg
Carbohydrate: 10g
Fiber: 1.5g
Sugars: 5g
Protein: 2g
B6: 5.3%
Calcium: 1.2%
Vitamin E: 1.4%
**Nutrition Facts will vary based on ingredients used